
Supplies you will need:
cardboard stock paper
2 eyelets with tool
matstock paper
12 in ribbon in cordinating color
hole punch
scissors
gluestick
ruler

1. To make the pages for the inside of your photo album cut the cardstock in half. Use about four sheets of cardstock paper. You can use the front and back of each page.
2. To make the front and backcovers, take one sheet of cardstock. Measure the width and length of the half papers. Then use a whole sheet of cardstock so that the end of the paper wraps over the top cover. The top page of your photo album will need to be half a sheet of cardstock.
3. Punch holes in all the pages about two inches inward and half an inch from the end. Put in the eyelets using the tool that comes with them. You will be punching holes through all the pages and the two covers. Make sure the eyelets are good and tight. This is what holds your album together.
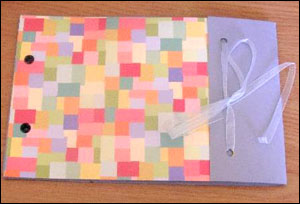
4. Make holes on the wrap end about one to one and a half inches inward. Also make the same holes on the end that this will cover. This will be how you close it. Place the ribbon though the holes on th top cover. Glue the middle down .Fold over the flap. Put ribbon though the holes and tie a simple bow.
5. Add whatever pictures you want inside. You can also use momentos or small stories about your family. Use the matsock for decoration on the cover and inside. There are very pretty papers out there to choose from.
This makes a great small gift for family members and is easy to carry in a purse to show off to friends.
About the author: Michelle Waite is a wife and mom of two boys. She enjoys making crafts and has written many crafting articles online.